Excel Form and ActiveX Controls in UiPath

Most companies rely on Microsoft Excel as their main data management tool because of its ease of use, accessibility, and flexibility (it’s almost like a user-operated database in many cases). UiPath’s Excel Activities package allows you to read and write data to Excel cells, rows, and even tables.
But the power of Excel may come with some unwanted side effects when it comes to RPA. For example, companies may have actual forms implemented in Excel, such as the one below.

In order to implement such a form, ActiveX Controls or Form Controls are used within Excel. This is something the UiPath Excel Activities package does not cover, so in this blogpost we’ll show an easy solution using VBA scripts that enables the automation of such forms.
For brevity, we will only cover checkboxes in this blogpost. However, working with other form controls such as button, combo box, spin button, list box, toggle button etc. would follow the same approach.
Before you start: Enabling Developer Tab
In one automation we built, the robot needed to handle customer equipment maintenance bookings. Again, there was no If Developer Tab is not already enabled, go to File -> Options -> Customize Ribbon and check the Developer option. You should then be able to see your Form Controls and ActiveX Controls sections.
First things first: which type of control are you dealing with?
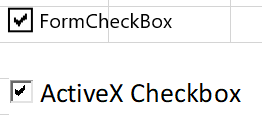
These two checkboxes look pretty similar, but one is a Form control and the other, an ActiveX control.
An easy way to identify which one you are seeing in your form is to turn off Design Mode. If the control is disabled, it’s an ActiveX control, otherwise it’s a Form control.
ActiveX Controls
ActiveX Controls have properties which can be found as follows:
Developer Tab > Turn on Design Mode
Select your ActiveX Control
Click Properties / View Code (remember that an ActiveX control can be used as an object in code) from the Developer Tab
Form Controls
Right-click your Form Control -> Format Control -> Control. The Control menu is the equivalent of Properties of an ActiveX Control, although it’s more limited in terms of capabilities.
Now that you are able to differentiate between the type of control you are dealing with, let’s see how to interact with them in UiPath.
Working with Form and ActiveX Controls in UiPath
The Invoke VBA activity inside an Excel Application Scope container gives us the capabilities to read and write data to and from Form/ActiveX Controls.
In order for this activity to work, you first have to enable the Trust access to the VBA project object model on your Excel file (File -> Options -> Trust Center -> Trust Center Settings -> Macro Settings -> Trust access to the VBA project object model)

Working with the checkbox Form Control
Get checkbox status

As explained above, all you have to do in UiPath Studio is to invoke a VBA script, stored in the project folder as a separate file. Here’s the code snippet we used for this file
Public Function getFormCheckboxValue(sheetName)
    getFormCheckboxValue = Sheets(sheetName).Shapes("FormCheckBox1").ControlFormat.Value ‘Method1
    getFormCheckboxValue = Sheets(sheetName).Checkboxes("FormCheckBox1").Value ‘Method2
    getFormCheckboxValue = Sheets(sheetName).Shapes("FormCheckBox1").OLEFormat.Object.Value ‘Method3
End Function
We recommend the first option, as it is brief and straightforward, generic enough and also configurable (you can pass the checkbox name as a parameter, so if the form changes at some point, you don’t need to update your VBA script but only change a config value).
Take note that the value returned by the function is not of type Boolean, as you would expect, but an Object having 3 possible values:
a) 1 (Checked)
b) -4146 (Unchecked)
c) 2 (Mixed)
This needs to be cast to int and then processed accordingly.
Change checkbox status
Sub changeFormCheckboxValue(sheetName, valueToSet)
    Sheets(sheetName).Checkboxes("FormCheckBox1").Value = valueToSet
‘valueToSet should be from the {-4146, 1, 2} set
Working with the checkbox ActiveX Control
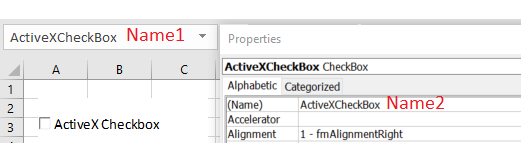
There are two ways of interacting with ActiveX controls, you can see them highlighted in the code below. Take note that the control has two Name values, and the two approaches highlighted below each use a different Name.
Public Function getActiveXCheckbox(sheetName)
    getActiveXCheckbox = Sheets(sheetName).OLEObjects("ActiveX CheckBox").Object.Value ‘Use Name 1 here
    getActiveXCheckbox = Sheets(sheetName).ActiveXCheckBox.Value ‘Use Name2 here
End Function
We prefer the first one, because it gives you the option of providing the checkbox name as a variable, so you can handle this at config level, and not have to update the VBA code if the form is changed.
This time, the Object returned should be cast to a Boolean type. However, if an invalid value was previously set to that control, it will contain a System.DBNull value. Make sure to verify that before casting it to Boolean.

Exploratory work, although necessary, can often turn out to be quite challenging, not because the solution to the problem is complex, but because the solution discovery process is slow/complex.
Configuring Excel and Active X forms is a perfect example of such exploratory work, and I hope that by documenting the solution, this blog post will act as a “map” that indicates to the shortest route, instead of wandering around (for a few days like I did 😊)
P.S. The cool thing about configuring the controls is that it works with any control property (color, visibility, etc.)